Having the ability to connect to a SQL database can provide greater opportunities for analyzing data sources. In this article, I will show you how to set up a connection to a MySQL database in Q.
Requirements
A MySQL database you want to import into Q
Knowledge of how to write SQL queries
Method
MySQL Driver Installation
The first step is to download and install the MySQL ODBC database connection driver. To install the Windows driver, do the following:
- Go to https://dev.mysql.com/downloads/connector/odbc/5.3.html
- Download Windows (x86, 64-bit), MSI Installer or the Windows (x86, 32-bit), MSI Installer, depending on which operating system you are running. If you are unsure which operating system you are running (32-bit or 64-bit), check Control Panel > System and Security > System > System Type on your computer. On the download page, click No thanks, just start my download.
- Run the downloaded MSI file to install the driver.
- Accept all default prompts during the installation process (nothing special needs to be done here).
Configuring the ODBC Connection
Once the driver installation is complete, you next need to create and configure an ODBC connection on your machine.
- Open your Windows Control Panel and go to Administrative Tools and double-click ODBC Data Sources (64-bit) or ODBC Data Sources (32-bit), again depending on the operating system you are running.
- Select the System DSN tab and click Add.
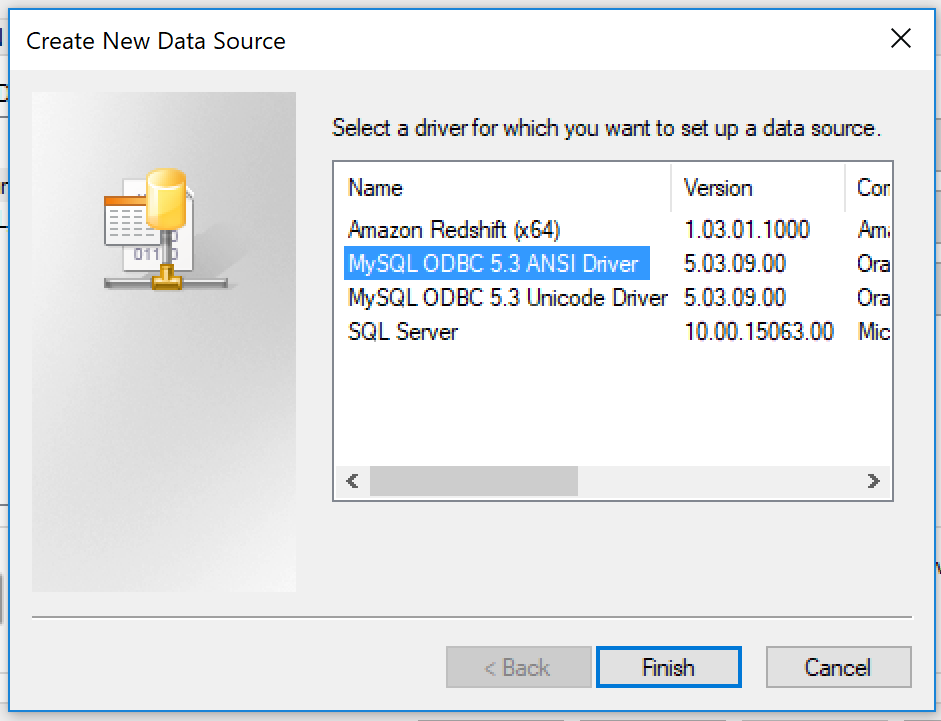
- Select MySQL ODBC 5.3 ANSI Driver.

4. Click Finish.
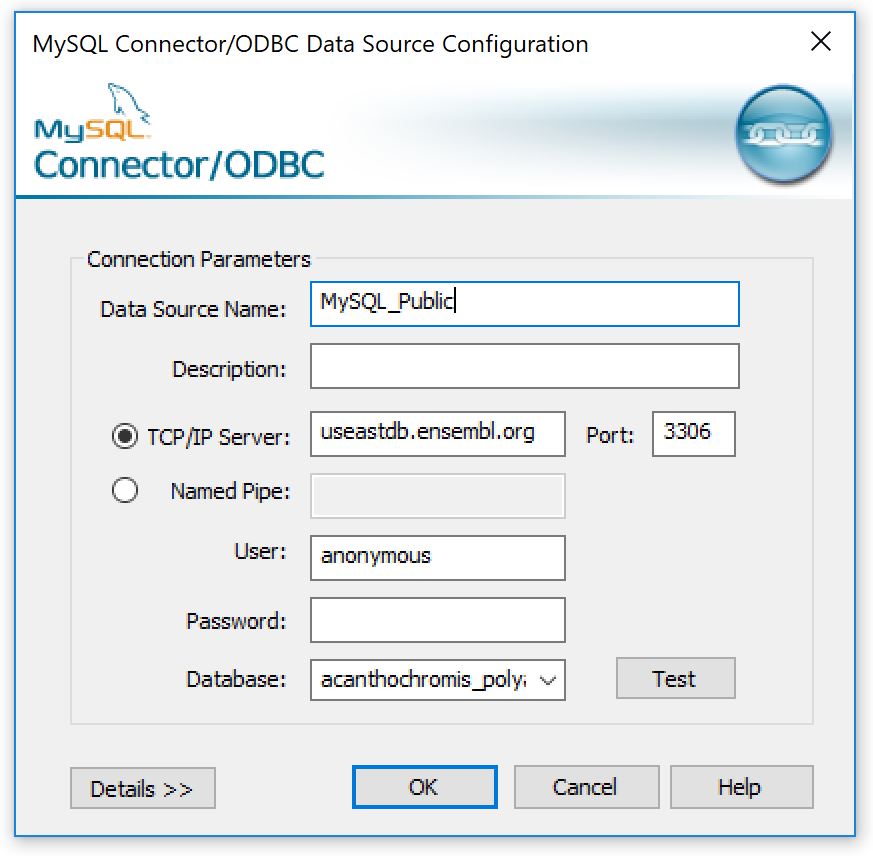
Next, you’ll see the MySQL Connector/ODBC Data Source Configuration window. For our example, we will connect to a public MySQL database called Ensembl.
Enter the following values:
Data Source Name: This is a connection reference name and can be anything you want.
Description: This is optional, so you can enter whatever you want here to describe the connect, or you can just leave this blank.
TCP/IP Server: useastdb.ensembl.org (however, this can be any of the Ensembl public MySQL database servers listed here: https://www.ensembl.org/info/data/mysql.html)
Port: 3306
User: anonymous
Password: None (leave blank)
Database: None (leave blank – this will be specified in the connection string below)

Click OK to save the configuration, then OK again to close the original window.
The driver installation and configuration is now completed and can be used to set up the database in Q.
Setting up the database connection in Q
We can now set up a connection to a MySQL database using the driver installed on our local machine. To set up a database connection,
- Select File > Data Sets > Add to Project > From Database (SQL).
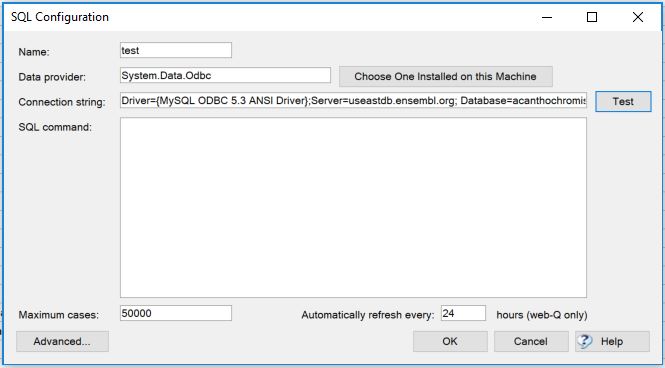
This opens the SQL configuration window. Here we’ll enter the following values:
- Name: This is a reference name and can be anything you want. I’ve entered MySQL_example.
- Data provider: Click the Choose One Installed on this Machine button and then select System.Data.Odbc.
- Connection String: The following connection string contains all of the necessary parameters needed to connect to the database, including the specific ODBC driver to be used, the server and database to connect to, authentication information (user id and password, if required), and port number. The string to paste into this field is below:
Driver={MySQL ODBC 5.3 ANSI Driver};Server=useastdb.ensembl.org; Database=acanthochromis_polyacanthus_core_94_1; UID=anonymous; Port=3306
After entering the above parameters, click the Test button, which will attempt to connect to the database with the provided parameters. If everything has been entered correctly, you will see a Connection OK pop-up box.
The final step is to enter the SQL query into the SQL command text box. For this example, we’ll just use a standard query from the database schema table. The database schema table contains a list of all tables in the database as well as stored table metadata.
SELECT * FROM INFORMATION_SCHEMA.TABLES WHERE table_schema = 'acanthochromis_polyacanthus_core_94_1'
Click OK to run the SQL and import the data. Q will prompt to do automatic setup as it does with all imported data sets. Once imported, you will be able to view all of the imported variables from the Variables and Questions tab.
Next